Setting Up Email for the Apple iPhone
This article will instruct you on how to configure email on your iPhone device.
In the instructions below, whenever it says, example.com, please replace it with your actual domain name.
How to Setup Up Your Email Automatically
- Go to Settings.
- Select Tap Passwords & Accounts.
- Tap Add Account.
- Then select Other, the last option at the bottom of the list.
- Tap Add Mail Account and add the following:
- Name: Your full name.
- Email: The complete email address. Example: snipsnap9000@example.com.
- Password: The password you set for the email account.
- Description: This will auto-populate with your email address, but you can edit it if you’d like.
- Tap Next.
- Mail will try to find the email settings and finish your account setup. If the automatic setup succeeds, tap Done to complete.
How to Setup Up Email Account Manually
If Mail is unable to find your email settings, then you will need to enter them manually. Click Here to Know Where to Find your Email Settings in cPanel
- Log into cPanel.
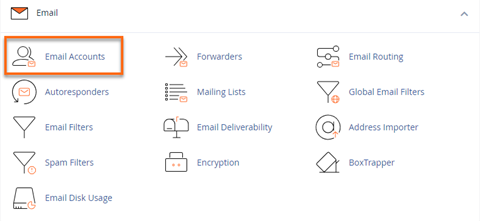
- Select Email from the left-hand menu.
- Click the Email Accounts icon.

- On the Email Accounts page, locate your email account. If your email account is not yet added to this section, please make sure to add it before configuring your email client. You can refer to this article on how to add an email account in the cPanel.
- Click Set Up Mail Client alongside your email account.
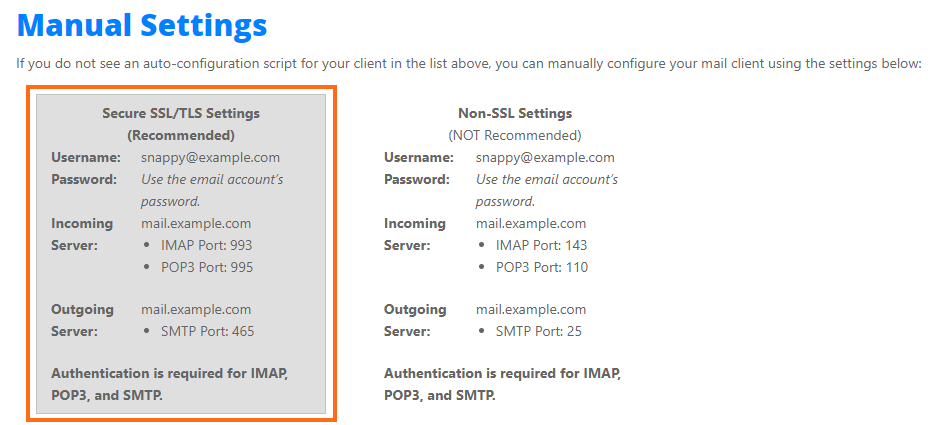
- On the next page, you will find the Manual Settings section that looks like this:
- You can choose to use either the SSL or Non-SSL Settings though Secure SSL Settings is recommended.

Once you have your email settings, proceed in setting up your email on your device. Tap Next, then follow these steps:
- Select IMAP or POP.
SSL SettingsNon-SSL SettingsIMAPPort 993Port 143POP3Port 995Port 110 - Under Incoming mail server, enter the following:
- Host Name: mail.example.com
- User Name: Enter your complete email address, user@example.com
- Password: Your email account password
- Under Outgoing Mail Server, you’re going enter the same information you used for the Incoming Mail Server settings.
- Host Name: mail.example.com
- User Name: Enter your complete email address, user@example.com
- Password: Your email account password
- Once all fields are filled out, click Next. If the settings are correct, a blue checkmark will appear next to each line, then it will advance to the next screen.
- On the next page, you can choose to allow Mail and Notes to sync.
- Click Save, and you’ll be returned to the Passwords & Accounts screen.
You are now ready to send and receive emails via your iPhone! If mail.example.com does not work for the incoming and outgoing servers, you can try using your IP address or server hostname (Example: gator1234.hostgator.com) instead. You can find these in your Welcome email or the General Information box on the right-hand side of your cPanel.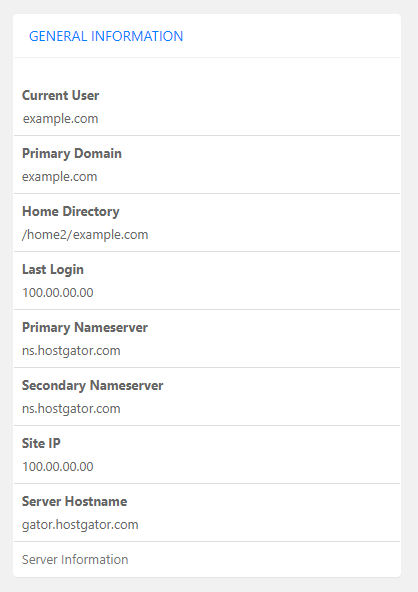
Older Versions of iPhone
- Press the Home button and select Settings > Mail, Contacts, Calendars.
- Under Accounts, select Add Account
- Select Other.
- Tap Add Email Account.
- Enter your name (which will show in the From field) and your full email address.
- Enter your email password and description (we recommend the full email address as your description).
- Press Save.
- Select IMAP or POP (What is the difference?)
- Under Incoming Mail Server, enter yourservername.hostgator.com as the Host Name. (Resellers use yourservername.websitewelcome.com. If this doesn’t work, try using your server’s IP address. VPS and Dedicated use your server’s IP address.)
- Enter the full email address as your User Name.
- Enter your email password and then scroll down.
- Enter the same information under the Outgoing Mail Server.
- Press Save.
You are now ready to send and receive emails via your iPhone.
Guide to Troubleshooting
The email settings provided above as displayed in your cPanel are the generic settings and should work for any email client. If your email is still not working, please make sure to check that your MX records and MX routing are correctly configured, and review any possible typographical errors especially your email password.
Here are some common email issues you may encounter and tips on how to fix them:
Cannot Verify Server Identity
When connecting to your email, the iPhone forces a secure connection for its initial connection attempts. If your domain is using a self-signed certificate, you may receive a warning similar to this. This means that the SSL encryption for the domain is not registered with a company that issues SSL certificates.
It’s important to note that while you can avoid seeing this warning by forcing the iPhone to connect with unsecured connections, you are only using a less secure connection in a way that does not resolve the issue.
The recommended resolution for this error is to accept the certificate as a trusted certificate:
- When you receive the popup with this error, click Details.
- On the next screen, click Accept.
You should now be able to access your email.
Cannot Connect Using SSL
If your domain does not have an SSL certificate and if you are not using the server name, you may receive this error. To attempt to proceed with the settings you have already provided, you may try to connect without SSL: While you can connect without SSL, we do not suggest using this method outside of troubleshooting because it is not secure.
- From the error menu, select No, you do not want to try setting up the account without SSL, and then tap Save.
- Tap the email account you just attempted to set up, and then scroll down to tap SMTP.
- Tap the Primary Server.
- Tap OFF to turn the SSL setting on, and then tap Server Port to change it to 465.
- Tap Done.
- Tap AT&T SMTP Server and then tap OFF to turn the server on.
- Tap Done.
- Tap Account Info, and then tap Advanced.
- Verify the incoming Use SSL setting is set to OFF.
- Tap Account Info, and then tap Done.
If your settings are correct for reaching your server, you should now be able to access your email.
I Cannot See My IMAP Folders
Please read the Apple support page.
What is the IMAP Path Prefix?
The correct code is INBOX (all caps).
I Cannot Delete Emails
By default, iOS attempts to delete IMAP email by putting it in the phone’s trash folder. This causes an error to come up, saying that the messages could not be moved to the trash folder.
To fix this: (Newest version of iPhone)
- Go to Settings.
- Tap Passwords & Accounts.
- Choose your email account.
- Go to Advanced.
- Select Deleted Mailbox.
- In the On Server section, select the Trash box under the server. This will allow you to remove email from an iPhone or iPod.
To fix this: (Older versions of iPhone)
- Go to Settings.
- Tap Mail, Contacts and Calendars.
- Choose your email account.
- Go to Advanced.
- Select Deleted Mailbox.
- In the On Server section, select the Trash box under the server. This will allow you to remove email from an iPhone or iPod.
Too Many Connections – 500 Errors?
On the iPhone, there is a function called Push. When it is enabled, it keeps the connection to our server open and continually checks mail. Consequently, this creates many IMAP processes and eventually conflicts with our Terms of Service.
To avoid running excessive IMAP processes, you can disable Push when you don’t need it.
To fix this: (Newer iPhone Versions)
- Go to Settings.
- Tap Passwords & Accounts.
- Select Fetch New Data.
- Toggle Push to Off.
To fix this: (Older iPhone Versions)
- Go to Settings.
- Tap Mail, Contacts, Calendars.
- Select Fetch New Data.
- Toggle Push to Off.
Now, instead of retrieving emails continuously as they arrive, your iPhone will use the global Fetch settings to retrieve emails manually or at intervals.